Fixing a bad polyurethane job on your wood furniture, floors, or other woodwork can be a daunting task.
Polyurethane, a clear finish, is popular for its durability and glossy shine, but when applied incorrectly, it can leave bubbles, streaks, or a cloudy appearance.
Whether you’re dealing with drips, sags, or uneven application, there are effective ways to repair and salvage your project.
This article will guide you through the steps to correct a bad polyurethane finish, ensuring your wood surfaces look their best.
Key Takeaways:
- Identify the specific issues with your polyurethane job, such as bubbles, streaks, or uneven coating.
- Proper preparation of the surface is crucial for a successful fix.
- Sanding, reapplying, or stripping the polyurethane might be necessary depending on the severity of the problem.
- Use the right tools and techniques for application to avoid future issues.
Identifying the Problem
Bubbles and Puddles
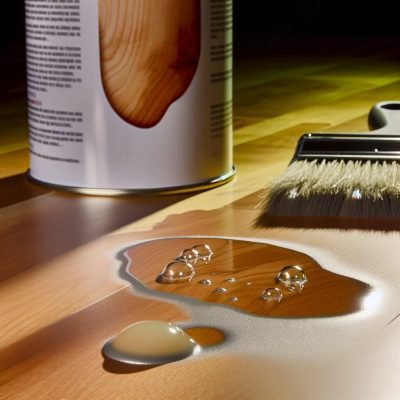
Bubbles and puddles are common issues that arise from shaking the polyurethane can or applying it in a very humid environment. To fix these, you’ll need to sand the surface lightly once the finish is dry and reapply a thin coat of polyurethane using a high-quality brush or a foam applicator.
Streaks and Runs
Streaks and runs occur when polyurethane is applied too thickly or unevenly. Sanding the drips and runs with fine-grit sandpaper until smooth and then applying a new, thin coat can effectively fix this issue.
Cloudy or Milky Finish
A cloudy or milky finish can appear if polyurethane is applied over a damp surface or in high humidity. If the cloudiness persists after drying, you may need to remove the finish and start over, ensuring the wood is completely dry and the room has adequate ventilation.
Preparation for the Fix
Before attempting to fix any issues, it’s essential to prepare the surface properly:
- Clean the surface thoroughly to remove any dust, dirt, or grease.
- Lightly sand the problematic area with fine-grit sandpaper to achieve a smooth base.
- Wipe down the surface with a tack cloth to remove all sanding dust.
Fixing Techniques
Sanding and Reapplying
For minor imperfections, sanding the surface lightly with fine-grit sandpaper and then reapplying a thin layer of polyurethane is often sufficient. Ensure the layer is even and applied with smooth, long strokes to avoid introducing new bubbles or streaks.
Stripping and Refinishing
In cases where the polyurethane finish is severely flawed, stripping off the existing finish and starting from scratch may be necessary. Use a chemical stripper or sanding method to remove the old polyurethane, prepare the surface as described above, and then apply a new coat of finish.
Expert Tips for a Smooth Finish
- Always apply polyurethane in a well-ventilated area to ensure proper drying and to avoid dust particles settling on the wet surface.
- Use a high-quality brush or foam applicator to apply the polyurethane in thin, even coats.
- Allow adequate drying time between coats, as recommended by the product manufacturer.
Maintenance and Care
Once you’ve successfully fixed the polyurethane finish, regular maintenance will keep your wood surfaces looking great:
- Dust and clean the surfaces regularly to prevent buildup.
- Avoid using harsh chemicals or abrasive cleaners that can damage the finish.
Relevant Resources
For more detailed guidance, consider watching instructional videos and reading additional resources:
- How to Repair a Polyurethane Wood Finish : Furniture Repair Tips
- Fixing Polyurethane Bubbles, Puddles, Runs and Brush Marks
- The Science Behind Polyurethane: How Does it Work?
- What is Polyurethane and its Uses in Woodworking?
- How to Safely Work with Polyurethane in a Woodworking Setting?
Advanced Repair Techniques
Addressing Deep Scratches and Gouges
For deeper scratches that penetrate through the polyurethane into the wood, you’ll need to fill the gouge with wood filler before reapplying polyurethane. Choose a filler that matches the wood’s color, apply it according to the manufacturer’s instructions, sand it smooth, and then apply a new layer of polyurethane.
Correcting Uneven Finishes
Uneven finishes can be a result of improper application or environmental factors. To fix this, sand the area with fine-grit sandpaper until it feels smooth and even to the touch. Clean the surface thoroughly to remove dust and apply a new, thin coat of polyurethane.
Removing and Reapplying Polyurethane
In some cases, the best course of action is to completely remove the existing polyurethane and start fresh. This can be done using a chemical stripper or by sanding. After removing the old finish, prepare the surface by cleaning and sanding before applying a new coat of polyurethane.
Frequently Asked Questions
Can I apply a new coat of polyurethane over an old one?
Yes, you can apply a new coat over an old one, provided the old coat is clean, dry, and lightly sanded to ensure good adhesion.
How long should I wait between coats?
Wait times vary depending on the product and environmental conditions, but generally, you should wait at least 24 hours between coats of oil-based polyurethane and 6 hours for water-based polyurethane.
What’s the best way to apply polyurethane without bubbles?
To avoid bubbles, do not shake the can of polyurethane. Stir it gently instead. Use a high-quality brush or foam applicator and apply with smooth, even strokes.
Additional Resources
For more detailed guidance on fixing polyurethane mistakes, consider these resources:
Watch these videos for practical demonstrations:
- How to Apply Polyurethane Without Bubbles, Puddles, Runs or Brush Marks
- The Science Behind Polyurethane: How Does it Work?
Explore further on String Pulp for related topics:
Remember, the key to fixing a bad polyurethane job is to assess the extent of the problem, prepare the surface properly, and apply the polyurethane correctly. With patience and the right techniques, you can achieve a smooth, durable finish that enhances the beauty and longevity of your wood surfaces.