

Effective Woodworking Tips for Beginners
Are you struggling to work with carving or any other woodworking because of not having enough skills?
Or are you looking for some woodworking tips to make your life easier?
If so, you’re not alone. It’s common for a beginner. I remember when I was starting out I could not even cut straight a piece of wood. Yeah that’s true..
Unfortunately , with lots of information it becomes more difficult to get the right information.
There are many lessons or advice out there for learning woodworking.
But what I really wanted was just few tips or tricks to get started.
Therefore I am bringing to you some basic but very effective tips to grow your woodworking journey .
Feel free to give a feedback..
Let’s dive in…;
5 Effective Woodworking Tips for Beginners that you should be knowing..
Tip 1 : How to make a center marking gauge?
You will need
- Scrap wood.
- A metal ruler.
- A wooden pencil.
Here we explain step by step on how to make a gauge for center marking.
Steps to follow
Step 1 :
# Take a scrap wood and draw a line passing through the center of the wood piece horizontally and vertically.
Step 2 :
# Make other two points at a equal distance from the center of the intersected line.

Step 3 :
# Drill two holes on both sides of the center where you marked earlier. And also on the center to insert the screw.

Step 4 :
# Apply a glue on the base of the wood pin and the walls of the hole and insert it in the hole.

Step 5 :
# Make sure it is standing straight. You can check with L-scale.
Step 6 :
# On the center hole of the wood, insert the screw from the back of the wood which will act like the marker.

Step 7 :
# It is ready for the work. Place it on the object to mark the centre and twist it around and lock it. Now pull it to draw a line.
It is a little harder to drag but you will get a clean deeper cut and you can always back it out. So surely you can bear with this gauge.
Tip 2 : Bandy clamp tips
Here some tips about how we can join the edge of the wood and a thin piece of plywood so that the piece can’t move.
You need a bandy clamp which has rubber band in it..

According to size of the material you have to keep ready your bandy clamp tool if the material is quite long you need have more bandy clams.
Step 1. Keep in standing mode the flat piece of plywood with the help of a side holder.
Step 2 . Apply glue on the upper edge and put small piece of plywood over it.
Step 3 . Now put the bandy clamps over the glued plywood .The rubber of the clamp will hold it tightly and both pieces of wood will cling easily.


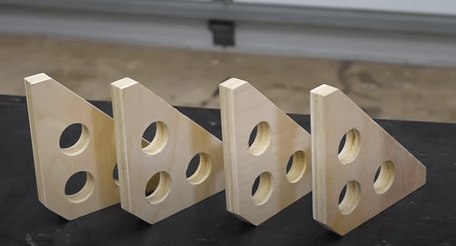
Tip 3 : How to make right angle or corner clamp jig?
What is the use of corner clamp ?
The corner clamp helps to hold two and more large pieces of wood, while you are gluing and screwing together. And you need two or more plywood triangular corner clamp.
How to make corner clamp (45 degree) ?
Make sure that the piece of wood is as straight as possible and it would be better if material will plywood or MDF.
Step :
1. Set the miter gauge to make a 45 or 90 degree cut and cut it. (whatever size you need)
2. Take the piece of that wood and flip it around on the board and then make another piece.(like this you can cut more pieces)

3. Now you have to set up a stop block at the miter saw.
4. You have to remove the corners of all triangles. (To reduce interference at the corner and to prevent the edges from peeling)

5. Make a duplicate piece of other material for template, so that you can make holes on the triangular piece.
6. Draw the square for three hole on the template and mark on center of the square. Shown below.

7. Drill out the three holes using tool.
8. Place duplicate triangle piece over the original cut off piece and drill out.

Tip 4 : How to Glue multiple pieces of lumber together ?
Are you facing the slipping and shifting issue to make a correct alignment ? Here is the solution:
Step 1. Take the pieces of wood and apply glue on it.

Step 2. Sprinkle a little bit of salt on the glued parts and join them. Salt, in order to prevent from slipping.

Step 3. Join them together and apply clamping pressure on it for few minute.

Tip 5 : Use of Dowel Jig.
There are many ways you can use dowel. Basically the dowel jig guides to drill in straight to the hole in the edge or face of a board.
There are many types of dowel jig in the market. But here we want to introduce few budget friendly things to use for making drill in a hole. The steps are below..
Step 1. Take a small nail, place that in between two areas that you are trying to join.

Step 2. Keep single piece of wood on those area.
Step 3. Press them down and mark will be seen on both parts and you will know exactly where you have to drill.

You can also use a dowel center to mark for drill a hole…
What is the difference between a carpenter and a woodworker?
Carpentry is described as the art of cutting and connecting wood to make buildings and other structures.
Woodworking is defined as the abilities of carpentry, cabinetmaking, and other woodworking crafts..
Conclusion
The article offers helpful advice on fundamental methods, safety measures, and suggested tools for novice woodworkers. These suggestions can help beginner woodworkers develop their abilities, elevate their level of craftsmanship, and start engaging in fruitful woodworking endeavors..